Public commands
Here's how to use cwc to perfom any actions you could do with the web console and be able to code some automation/IaC scripts (i.e: shells scripts, ansible roles, terraform, etc).
Notes:
- To checkout how to install and update the
cwccli checkout this tutorial. - For the commands accessible for the administrators, checkout this tutorial
Translations
This tutorial is also available in the following languages:
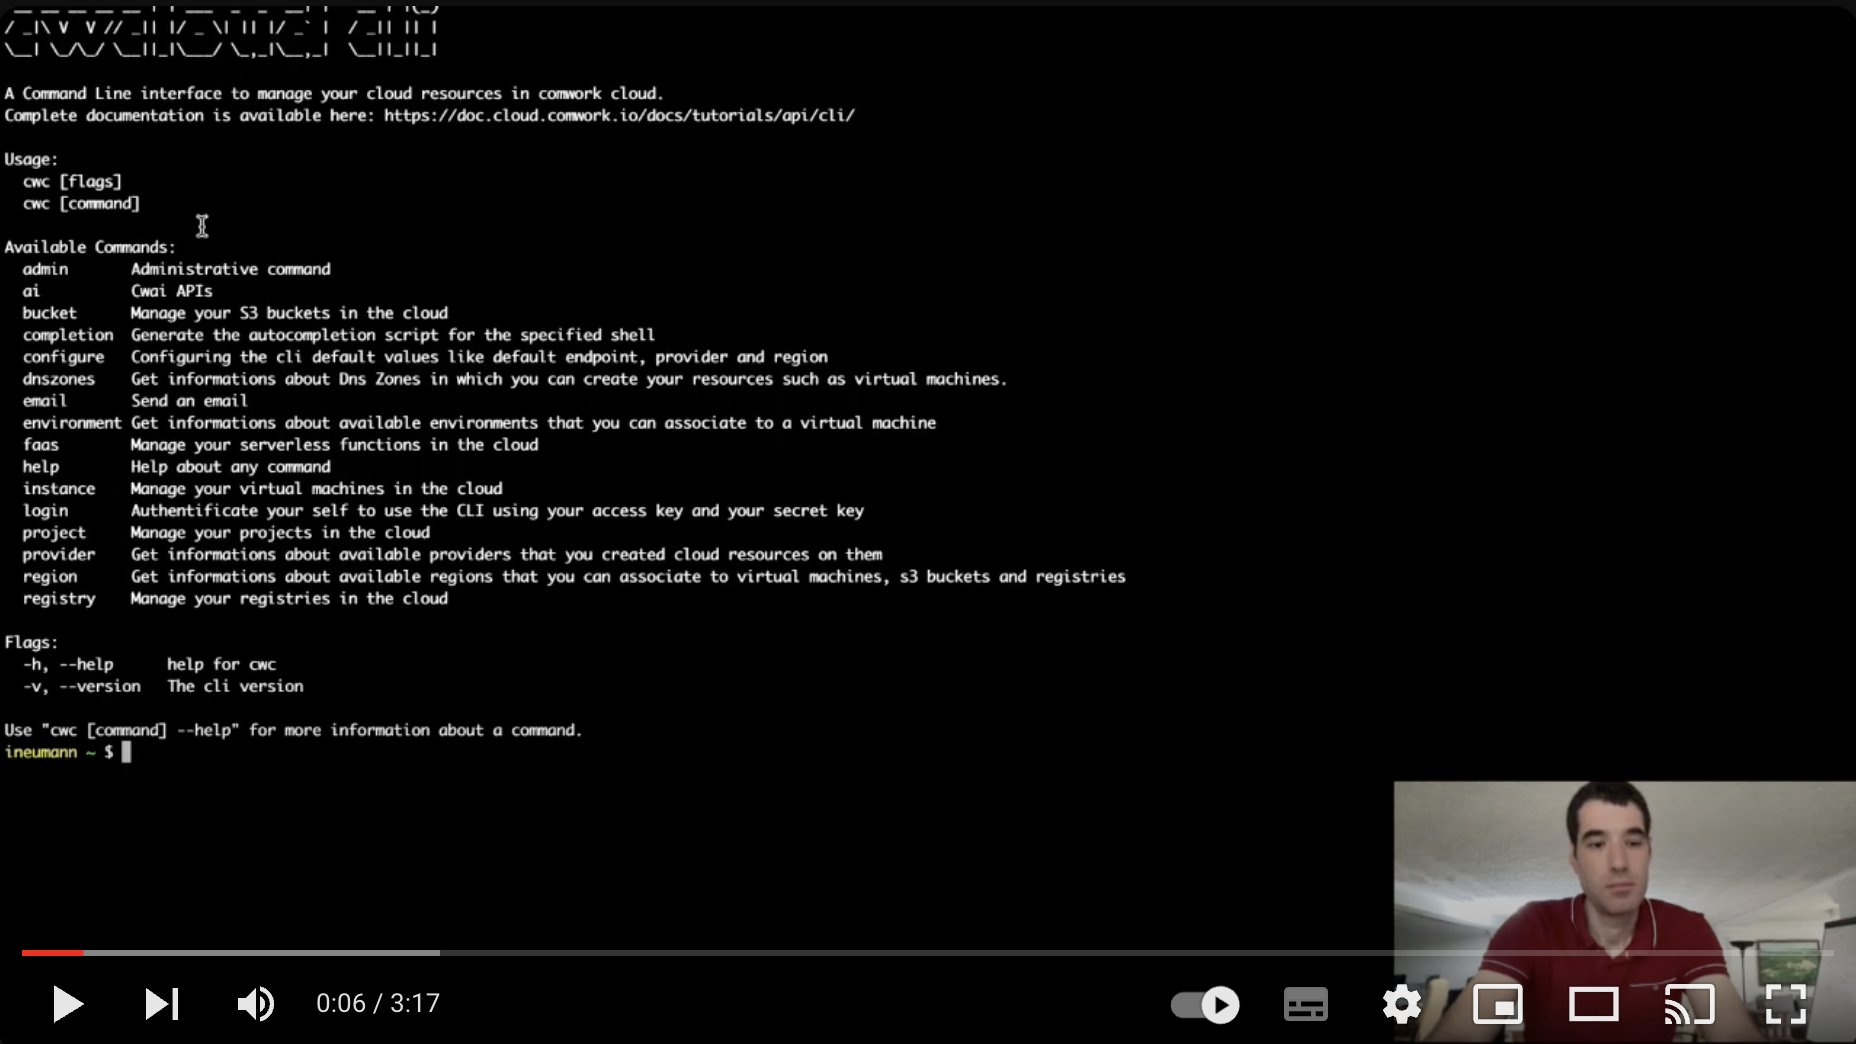
Usage, help version
cwc help # or -h or --help for getting help
cwc version # or -v or --version for getting the current version
Authentication
Login
cwc login -a <access_key> -s <secret_key>
In order to create the access_key and the secret_key, you can checkout this tutorial.
Default configurations
Read the current configurations
cwc configure get endpoint
cwc configure get provider
cwc configure get region
cwc configure get format
cwc configure ls
This command will list the available config files available on your .cwc folder in your machine.
Configure
Configuring the default endpoint, default region, default output format and provider with:
cwc configure
You can tap enter if you want to keep the current value:
$ cwc configure
Default endpoint [https://cloud-api.comwork.io]:
Default provider [ovh]:
Default region [UK1]:
Default format [json]:
Note: After configuring your cli a config file will be created automatically in the .cwc folder in the home directory.
You can check available providers and regions with the following commands:
cwc provider ls
cwc region ls # you have to set the provider to get the up to date list of available regions here
For each settings you also can configure with a specific command:
cwc configure set endpoint https://cloud-api.comwork.io
cwc configure set provider ovh
cwc configure set region UK1
cwc configure set format json
And you can also create a config file to use with the configuration you made:
cwc configure switch <config_file_name>
This will take the config file existing in the .cwc folder you choose and set up the configuration.
If you want to import a config file existing in a different directory you can use the following command:
cwc configure import <config_file_path>
Output's formats
The know output's format are the following:
plain: columns separated with spaces, usable in a shell scriptjson: JSON format, usable in more high level programing languagespretty: more understandable output for human but not very usable in a program or shell scripts. This format can be punctually asked by adding-por--prettydirectly in your commands.
Projects
List
cwc project ls
Note: You can add -t (or --type) flag to get filter the projects by type (either vm or k8s)
Search Project
Search Project By ID
cwc project ls -P <project_id>
cwc project ls --id <project_id>
Search Project By Name
cwc project ls -n <project_name>
cwc project ls --name <project_name>
Search Project By URL
cwc project ls -u <project_url>
cwc project ls --url <project_url>
Create
cwc project create -n <project_name>
Notes:
- If you want to create a project in another Gitlab instance you can provide the Gitlab host, the group id, your access token and your git username by adding these options:
-hor--host: Gitlab instance host-tor--token: your Gitlab access token-gor--git: Your Git username-nor--namespace: namespace or group id where the project will be created-por--type: Project type (vm or k8s)
Delete
Delete Project By ID
cwc project delete -p <project_id>
cwc project delete --id <project_id>
Delete Project By Name
cwc project delete -n <project_name>
cwc project delete --name <project_name>
Delete Project By URL
cwc project delete -u <project_url>
cwc project delete --url <project_url>
DNS zones
List
cwc dnszones ls
Environments
List
cwc environment ls
Get by ID
cwc environment ls -e <environment_id>
cwc environment ls --environment <environment_id>pretty
Instances
List instances types of selected provider
cwc instance type ls
List instances
cwc instance ls
List instance by ID
cwc instance ls -i <instance_id>
cwc instance ls --instance <instance_id>
Create
cwc instance create -n <instance_name> -e <environement> -t <instance_type> -p <project_name> -z <zone>
cwc instance create -n <instance_name> -e <environement> -t <instance_type> -i <project_id> -z <zone>
cwc instance create -n <instance_name> -e <environement> -t <instance_type> -u <project_url> -z <zone>
Notes:
- use
novazone for ovh and1or2for scaleway instance_typecorresponds to the provider instance sizing (i.e:DEV1-Mfor Scaleway)- use
--dns_zoneor-dto choose the dns zone in which the instance will be created (you can list availble zones usingcwc dnszones ls)
Attach
cwc instance attach -n <playbook_name> -t <instance_type> -p <project_name> -z <zone>
Notes:
- use
novazone for ovh and1or2for scaleway instance_typecorresponds to the provider instance sizing (i.e:DEV1-Mfor Scaleway)
Update status
cwc instance update -i <instance_id> -s <action>
Notes:
- The status must be
poweroff,poweronorreboot
Delete
cwc instance delete -i <instance_id>
cwc instance delete --instance <instance_id>
Buckets / object storage
List
cwc bucket ls
Get by ID
cwc bucket ls -b <bucket_id>
cwc bucket ls --bucket <bucket_id>
Renew credentials
cwc bucket renew -b <bucket_id>
cwc bucket renew --bucket <bucket_id>
Delete
cwc bucket delete -b <bucket_id>
cwc bucket delete --bucket <bucket_id>
OCI / Docker registries
List
cwc registry ls
Get by ID
cwc registry ls -r <registry_id>
cwc registry ls --registry <registry_id>
Renew credentials
cwc registry renew -r <registry_id>
cwc registry renew --registry <registry_id>
Delete
cwc registry delete -r <registry_id>
cwc registry delete --registry <registry_id>
FaaS / Serverless
Demo
Languages
List
cwc faas languages ls
Serverless functions
List
cwc faas function ls
Get by ID
cwc faas function ls -f <function_id>
cwc faas function ls --function <function_id>
Create
cwc faas function create -n <function_name> -l <language_name>
cwc faas function create --name <function_name> --language <language_name>
- By default the function created is private if you add
-por--publicflag the function becomes public. - There are other optional flags for direct creation:
-l # or --language: Language of the function
-r # or --regexp: regular expression for args protection
-u # or --callback-url: callback's URL
-a # or --callback-authorization-header: Authorization's header of the callback
-g # or --args arguments: (you can repeat this option for each argument's values)
-c # or --code: source code of the function
- Instead of entering the optional flags behind each other you can enter your data with the interactive mode by adding
-ior--interactiveflag.
Update
cwc faas function update -f <function_id>
cwc faas function update --function <function_id>
You can update the function by going through the interactive mode by adding -i or --interactive flag or you can pass your data directly with these optional flags:
-l # or --language: Language of the function
-r # or --regexp: regular expression for args protection
-u # or --callback-url: callback's URL
-a # or --callback-authorization-header: Authorization's header of the callback
-g # or --args arguments: (you can repeat this option for each argument's values)
-c # or --code: source code of the function
Delete
cwc faas function delete -f <function_id>
cwc faas function delete --function <function_id>
Invocations
List
cwc faas invocation ls
Get by ID
cwc faas invocation ls -i <invocation_id>
cwc faas invocation ls --invocation <invocation_id>
Create
cwc faas invocation create -f <function_id>
cwc faas invocation create --function <function_id>
- There is other optional flag for direct creation:
-a # or --args: arguments (you can repeat this option for each argument's values)
-s # or --synchronous: enable the synchronous mode
- Instead of entering the optional flag you can enter your data with the interactive mode by adding
-ior--interactiveflag.
Delete
cwc faas invocation delete -i <invocation_id>
cwc faas invocation delete --invocation <invocation_id>
Truncate
cwc faas invocation truncate
Triggers
List kinds
cwc faas trigger kinds
List
cwc faas trigger ls
Get by ID
cwc faas trigger ls -t  <trigger_id>
cwc faas trigger ls --trigger  <trigger_id>
Create
cwc faas trigger create -f <function_id>
cwc faas trigger create --function <function_id>
- There are other optional flags for direct creation:
-n # or --name: trigger's name
-k # or --kind: trigger' kind
-c # or --cron_expr: trigger's cron expression
-a # or --args: arguments (you can repeat this option for each argument's values)
- Instead of entering the optional flag you can enter your data with the interactive mode by adding
-ior--interactiveflag.
Delete
cwc faas trigger delete -t  <trigger_id>
cwc faas trigger delete --trigger  <trigger_id>
Truncate
cwc faas trigger truncate
Kubernetes
Deployments
List deployments
cwc kubernetes deployment ls
List deployment by ID
cwc kubernetes deployment ls -d <deployment_id>
## or
cwc kubernetes deployment ls --id <deployment_id>
Create deployment
cwc kubernetes deployment create -n <deployment_name> -d <deployment_description> -c <cluster_id> -i <project_id> -e <environment_id>
## or
cwc kubernetes deployment create --name <deployment_name> --description <deployment_description> --cluster <cluster_id> --project <project_id> --environment <environment_id>
Delete deployment by ID
cwc kubernetes deployment delete -d <deployment_id>
## or
cwc kubernetes deployment delete --id <deployment_id>
Email
Send an email
You can send an email with the following command:
cwc email -t <recepient_email> -s <subject> -c <content>
Notes:
- There are other optional flags you can add:
-fto add customized expeditor email address-bto add a bcc email address